
LED strip lights have become incredibly popular and captivating for various occasions. With a wide range of sizes, colors, and lengths available, finding the perfect LED strips for your needs is a breeze. Not only do LED strip lights create a beautiful lighting effect, but they also work wonders when reflected off a flat surface, making them the ideal choice for decorative purposes.
The great news is that installing LED strip lights is a piece of cake and can be done without any professional assistance. Today, we will walk you through the complete installation process of these amazing lights. We’ll also cover topics such as splitting a single LED strip, merging multiple LED strips, and using an RGB controller, making this guide incredibly helpful for everyone.
Powering Your LED Strip Lights
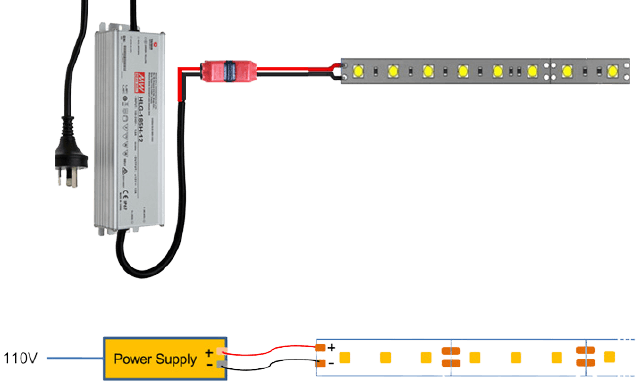
If you’ve purchased just an LED strip reel, it might not come with proper wiring. But don’t worry, with some basic wiring and a compatible driver, you can easily power your LED strip lights. Here’s a step-by-step guide:
- Carefully unpack all the components in the package, including the LED strip light reel.
- Connect the LED strip to the connector, which contains a red and a black cable.
- Attach the red cable to the “+” terminal of the LED strip and the black wire to the “-” terminal.
- Once the wires are connected, simply push the rear side of the connector inwards to secure the connection.
- Connect the other side of the connector to a suitable driver to power the LED strip light.
Connecting Multiple LED Strip Lights to a Single Power Source
In many cases, you’ll need a long strip of LED lights to cover a larger area. If a single strip isn’t long enough to do the job, you’ll have to connect multiple LED strips. Here’s how you can connect them to a single power source:
- Use a two-way power splitter to connect multiple LED light strips to a single adapter.
- Ensure that the wattage of the light strips doesn’t exceed the total output capacity of the adapter.
- Connect the LED strips to the splitter.
- Plug the single end of the splitter directly into the power adapter, which can be plugged into an AC wall socket.
Installing LED Strip Lights Made Easy
LED strip lights have a compact and linear design, making them highly versatile for installation. You can easily install them on any flat surface without worrying about directional constraints. Their lightweight nature ensures that they stay in place once stuck, whether it’s behind a TV, under drop-down ceilings, or below kitchen furniture.
Most LED strip lights come with pre-applied adhesive on the back, covered by a protective film. Simply remove the top film and stick the LED strip lights directly. Alternatively, you can use 3M double-sided tape for a more secure grip on the back of the strip. Just remember not to cover the front portion of the LED strip light with tape, as it could obstruct the lighting effect.
Is It Possible to Cut LED Strip Lights?
If you have purchased a longer LED light strip than you need, you can easily cut it to the desired length. However, you must be careful not to damage the LEDs on the strip. Look for dedicated cutting markers on the strip, usually found after every 3 or 6 LED lights. Cutting the strip will expose copper pads on both ends, allowing you to reconnect it to the same or different power source. Breaking LED light strips into pieces also enables you to install them at different angles or create sharp turns on walls or ceilings.

Coupling LED Light Strips Together
Connecting different LED light strips allows you to install lights in difficult angles and corners. The best advantage of coupling LED strips together is the ability to achieve 90-degree turns, which is often needed when installing them on walls or ceilings. Here’s how to do it:
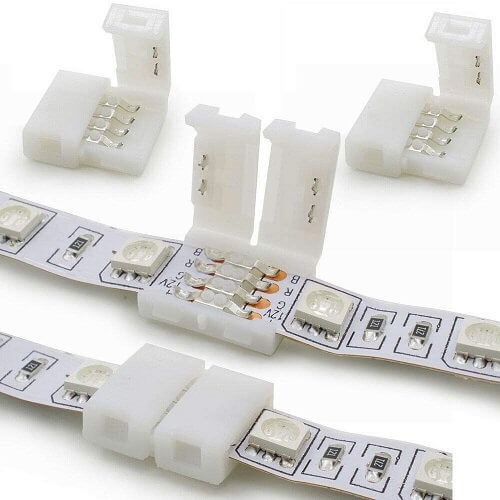
- Use fast solderless connectors available in the market to easily connect LED light strips.
- Remove the lock pad on the connector if you have a fast solderless LED connector.
- Peel back a section of the covered portion of the LED strip to reveal the adhesive side.
- Insert the LED strip directly into the fast connector, aligning the copper pads on the strip with the conductor pins of the connector.
- Once connected, close the lock pad of the connector.
If you don’t have a solderless connector, you’ll need to manually solder the connections between the LED strips. This process requires extreme care and precision to avoid damaging the LED strip.
RGB Connection & RGB Control for LED Strip Lights
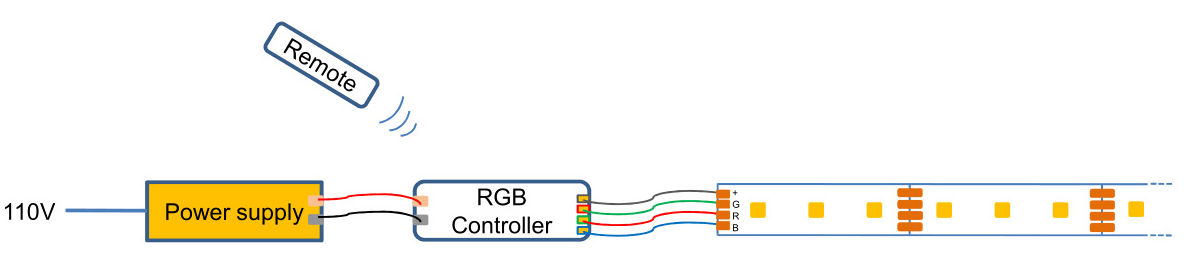
RGB LED light strips are highly popular for their ability to produce a variety of colors. They come with an RGB controller that offers predefined lighting modes for special occasions. To connect the controller with the LED strip, follow these steps:
- RGB LED strips have additional terminals indicated by the symbols “+”, “G”, “R”, and “B”.
- The RGB controller included with the strip also has similar terminals.
- Connect the identical terminals of the RGB connector and LED strip.
- Connect the RGB connector directly to the power supply using power cables or a DC connector.
- If your RGB controller has a pre-installed 4-pin connector, insert the connector into the strip, and you’re good to go.
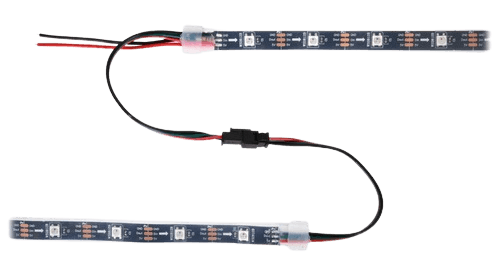
Connecting LED Strip Lights in Series
LED light strips can be connected together to create a unified lighting strip according to your requirements. To connect multiple LED light strips in series, follow these steps:
- Introduce an LED amplifier into the circuit to protect the LED light strips from voltage surges and drops.
- Suppose you have multiple RGB LED strips that need to be connected in series to a single source and controlled by a single RGB controller. In that case, you’ll need an LED amplifier for each LED strip except the first one.
- Connect the RGB controller to the first strip and power supply as explained earlier.
- Connect an LED amplifier to each individual LED strip, ensuring they align with the identical terminals on the strips.
- Connect the amplifier terminals to the identical terminals on the RGB controller using an additional wire.
- If you’re using different power supplies for the LED strips, connect the power cables from the amplifier to their respective power supply ports, making sure to connect the positive terminal with the red cable and the negative terminal with the black cable.

Conclusion
Properly installed best led light strips can transform any space into a captivating environment. While the installation process may seem a bit tedious, especially with RGB LED strips, there are many components available that can simplify the process for you.
Today, we’ve covered all the necessary steps for installing LED strip lights. If you follow our guide carefully, you’ll be able to install these lights easily without any additional help. If you encounter any difficulties, feel free to reach out to us through the comment section.